..
CREATING THE MODEL
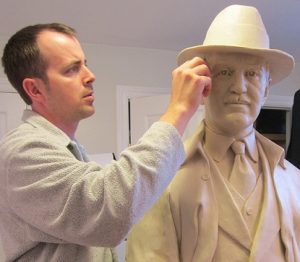
The first step in creating a bronze sculpture is to create an original model. For the Stanley Thompson monument I created the model using plasticene over styrofoam with a wood and steel armature. You must start with a solid armature that is able to withstand the weight of the clay or plasticene without sagging. I started with a wood armature supported with steel, then added styrofoam to build up the baulk of the figure. Finally I added the plasticene on top of the styrofoam where I was able model the detail into the sculpture.
.
CREATING A MOLD OF THE ORIGINAL
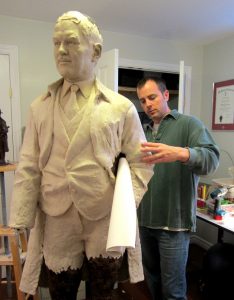
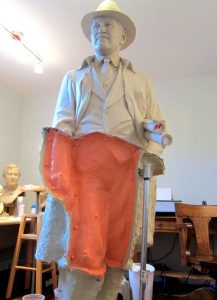
When the model is complete it is time to make a mold. The mold consists of two parts, the soft flexible inner mold which captures the detail of the sculpture and the ridgid support mold which will be used to hold the shape when the wax copy is created. For this project I used a silicon flexible mold (Smooth-On Rebound 25) and a ridgid support mold (Smooth-On Plasti-Paste II) and I divided the molds into 5 sections.
WAX COPY
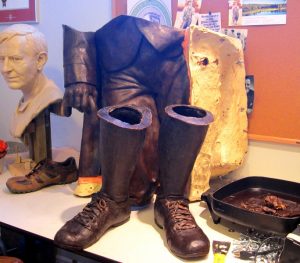
When the molds are set they are removed from the original model and reassembled. A molten wax copy is brushed on the inside surface of the mold in layers to a thickness of 3/16 to 1/4 inch. When the wax is finished and cooled the molds are removed and the wax copies are revealed leaving an exact wax replica of the original sculpture.
THE WAX COPY IS SPRUED AND GATED
A wax cup with wax rods, called gates are attached to the sculpture. These gates will create channels in the final mold which will allow for the molten bronze to be poured and flow into the mold. Core pins are pushed through the wax at strategic points to ensure that the investment mold will not collapse when the wax is “lost”.
CREATING THE INVESTMENT MOLD
The gated wax sections need to be encased in a mold able to withstand the high temperature required to, melt out the wax from inside and recieve the molten bronze once the wax is gone. The mold also needs to capture and reproduce the fine surface detail of the original sculpture. For the Stanley Thompson sculpture we used a plaster/sand investment mold. Ceramic shell is another material that is often used to create the investment mold.
THE BURNOUT
The burnout step is removing the wax from the mold. The finished investment mold is placed upside down in a kiln and heated over several days up to 700 C. This melts the wax out of the mold and burns away any moisture from the investment. After cooling down to about 100 C the molds are carefully removed from the kiln and are set to recieve the bronze pour.
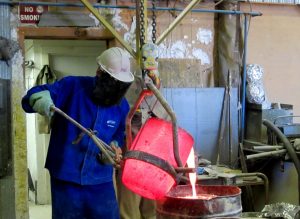
BRONZE POUR
While the investment molds are still warm, bronze ingots are heated in the kiln to 2200 degrees fahrenheit until it is a molten liquid state and ready to pour. The bronze is poured into the mold and fills all space left by the melted wax.
.
.
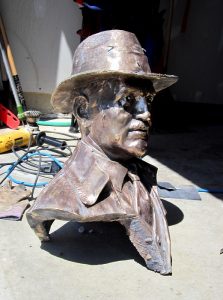
REMOVING INVESTMENT AND CLEAN UP
After a few minutes the bronze is cool enough that it is in a solid state and you can now break away the investment. Everything that was once wax is now bronze. All of the sprue and gate system must be removed and the surface cleaned and prepared for welding.
.
.
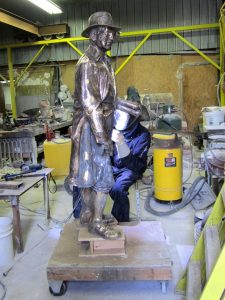
WELDING, FINISHING AND CHASING
The 5 cast sections of bronze now need to be welded together. Once welded the metal surface needs to be reworked by grinding, sanding, filing and eventually sand blasting to hide any signs of the weld. What you are left with is a hollow bronze copy of the original model.
.
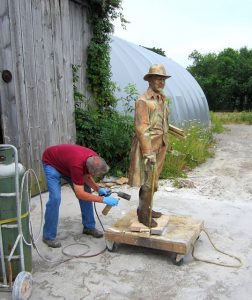
PATINA AND WAX
When the bronze is completely cleaned and finished to the artists statisfaction a patina is added to the sculpture. Bronze will develop a natural patina over time but for an immediate patina an artificial one is created. I used a Ferric Nitrate solution to create a soft brown patina on the Stanley Thompson monument. First, the sculpture is heated so when the solution is srayed onto the surface it sizzles into the bronze. When an even colour is achieved you coat the entire surface with paste wax.
.
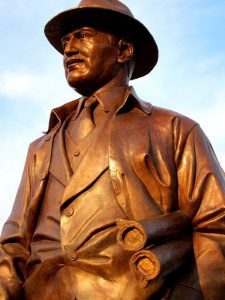
FINAL SCULPTURE
When the patina with the final wax coat is cooled the sculpture can be gently polished to bring out the fine detail of the sculpture. The last step in this process will be to mount the sculpture on some form of base or for an outdoor sculpture install it where it can be enjoyed and appreciated.
Contact:
Robert Dey
14 Farrugie Street
Paris, Ontario
N3L 0A8
Phone: 519-442-7965
Email: robertdey@rogers.com